
Let's Talk Packaging!
Mar 15, 2023
Although packaging can seem fairly straightforward, the process actually presents a variety of challenges. Some constraints are intrinsic to the task, like protecting them during transit. And others are self-imposed, like being environmentally conscious.

Taking a step back, the production process itself can drive the packaging approach to a large degree. The overall plan with this product is to ship them from the production facility to my studio in California. Then they’ll be inspected as necessary and sent on to their final destination- you!
Each individual unit needs an outer shell of some kind (i.e. a box), and some way to hold and protect the device inside of that enclosure. In addition to these practical considerations, the aesthetics should be an extension of the product that’s enclosed- an introduction of sorts.

This is a bit where one challenge comes into play… over-packaging for the sake of the unboxing experience can lead to a box that’s not very good for the environment.
If I were doing things by “coolness” alone, I’d probably go for a magnetic flap rigid box with a foam insert. And that would actually be fairly easy to do since there’s tons of companies that make them. Just provide the size and artwork and you’re done.
But as I considered that option more, the drawbacks were clear. The magnet prevents the cardboard from being recycled and foam isn’t good for the environment. Plus, those packages are quite heavy, adding to the environmental footprint of the whole shipping process.
A corrugated outer box seemed like a good alternative- but how big of a box and how thick of cardboard? By making the box just slightly larger than the timer, it gives some space for protection. And based on some reference boxes (and input from folks like if Lumi, that pointed me towards an e flute box.
Thjs has the ability to have nice crisp folds, and quality printing… and with the small size of the box, it provides adequate crush protection.
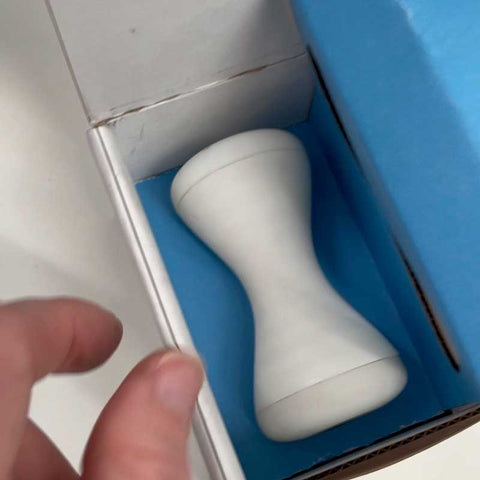
But what to put inside to protect the timer to protect against shock, like in the case the box is dropped? Again, steering away from bubble wrap or foam, I considered wrapping it in paper or crinkle cut. But they didn’t feel very “special”- just more like traditional void fill. So I leaned into cardboard again, attempting to be very purposeful with the design.

A cut-out tray of some sort is the traditional approach but I wanted to have a bit of extra protection than resting the timer directly against the cardboard. Essentially somehow suspending it in the middle. With a full cut out the shape of the timer, I found that I needed some kind of pad below and above. Eventually I arrived at a way of supporting it from the top and bottom… and then spacing those properly inside the box. This secured it from moving, as well as provided a bit of cushioning.
I also created a bit of a “reveal” experience… and made the whole interior from one piece of cardboard for a bit of an origami feel.
This kind of reflects the idea of using less precious materials (cardboard alone instead of magnets and foam) and making them feel special by the thought put into the design, and the experience of how it functions. The wallet I crated with Tyvek also embodies this approach of elevating the utility of minimalist materials.
Functionally the timer feels well protected, the box is lightweight, and the environmental impact is minimized since a limited amount of material is used (the inside is mostly air), it’s all recyclable with a single method, and the weight and size allow for efficient transport.
So… I’m not a package designer and I did my best for this first round. Hopefully it does justice to the product itself or at least serves its purpose in transport and allows for the product to shine. Let me know if you have any thoughts or feedback in the comments below!

8 comments
@Boris- Yep! That’s pretty much what it is… that single piece wraps around and there are cut-outs on the top and bottom. And the rest of it is spacers to position that part in the middle, and a flap over the top.
You can see a bit more detail at the end of this laser cutting demo of it:
https://www.instagram.com/getfocustimer/reels/
@Dan- Thank you! Glad you’re enjoying the behind the scenes stuff!
@Mick- Thanks for coming and backing agin!
@Kevin- Yeah it’s nice when I can align simplicity with being environmental… sometimes it’s extra work but worth it!
Great update. Why not provide two cutouts and sandwich the timer between two of them? As along as the whole middle piece sits inside against outer packaging it should be well protected against the drops.